
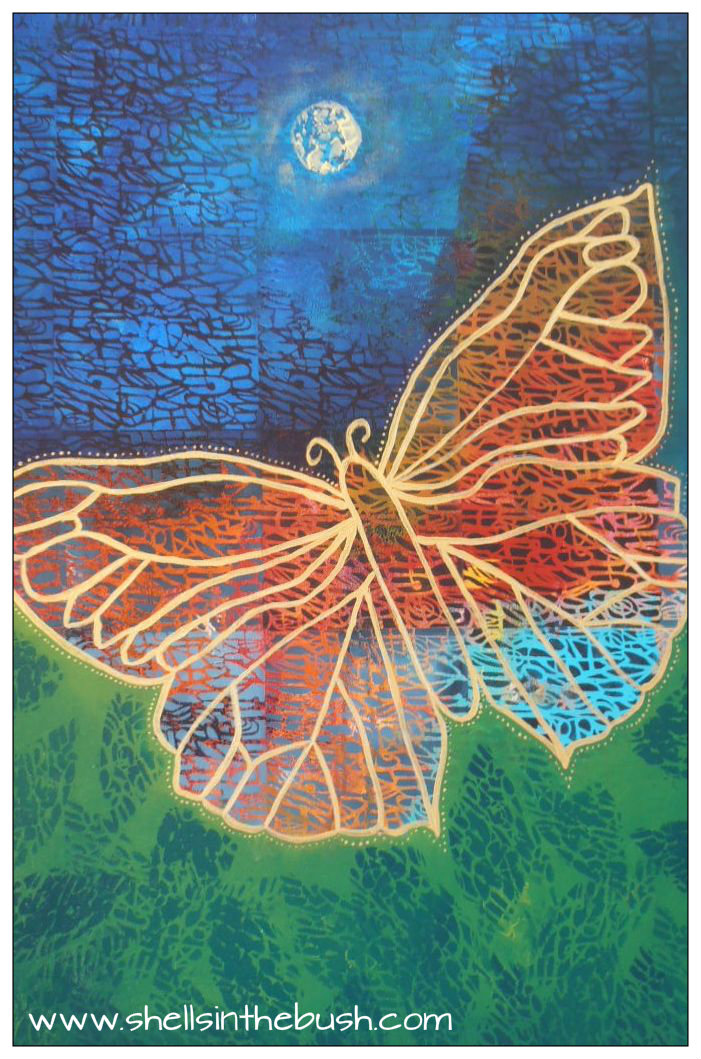
Here is my latest painting, 'Butterfly in the Moonlight', which I created using the Artistcellar stencils.

I first saw these stencils through the Jill Berry's Artistcellar TEXTures Stencil Launch and Giveaway blog hop. I hopped through the blogs and entered the giveaways but didn't win so I bought some. Lisa from Artistcellar even gave me a discount on the postage so that was awesome.
This is the stencil I used:

Here are some evolution shots:

Here are some tips for new stencil users - ie things I've learnt in the past couple of weeks about stencils:
1. Practice and play around first esp with tools to apply paint such as a stencil brush and a brayer. I used a stencil brush. I haven't got any small spray bottles but that is next on my list to buy/use/try. And try out reverse stencilling - you will need 2 brayers/rollers and some plastic or freezer wrap to go between the paint down stencil and the clean brayer.
2. Thick paint is better than watered down paint. Heavy body paint is good, in the finished painting the leaves at the bottom have been made with Golden Fluid Acrylics - so yes they are ok to use.
3. Use a dry brush or get as much water out of your brush before loading up with paint. Watery paint will run under the stencil - not a total disaster but it may not be the effect you are looking for. See bottom left painting the square on the top right, so I added another layer over it and a wash in parts too.

4. Decide whether you want those lines separating each stencil or you want them to join up together as I did for the butterfly painting.
 The above stencil is from the Cathedral series. I used fluid acrylics which ran a little, on watercolour paper and then put a blue phalo wash over the top.
5. Keep warm soapy water in the sink/bucket to wash and clean your stencil regularly. Paint will get under the stencil and when you move it to a different position you will have paint in places you don't want. Keep some old tea towels handy too to dry off your stencil so you can get back to the fun.
6. Contrasting colours work well - such as darks over light or light on dark. Once again, play around and experiment first.

7. Research - Claudine Hellmuth has just introduced a new line of her stencils, her blog has some great tips and here is a great video clip from her:
Like all new tools they take some time to get use to, so I'm going to keep playing around with them and having fun. Are you having fun with stencils too?
I first saw these stencils through the Jill Berry's Artistcellar TEXTures Stencil Launch and Giveaway blog hop. I hopped through the blogs and entered the giveaways but didn't win so I bought some. Lisa from Artistcellar even gave me a discount on the postage so that was awesome.
This is the stencil I used:

Here are some evolution shots:

Here are some tips for new stencil users - ie things I've learnt in the past couple of weeks about stencils:
1. Practice and play around first esp with tools to apply paint such as a stencil brush and a brayer. I used a stencil brush. I haven't got any small spray bottles but that is next on my list to buy/use/try. And try out reverse stencilling - you will need 2 brayers/rollers and some plastic or freezer wrap to go between the paint down stencil and the clean brayer.
2. Thick paint is better than watered down paint. Heavy body paint is good, in the finished painting the leaves at the bottom have been made with Golden Fluid Acrylics - so yes they are ok to use.
3. Use a dry brush or get as much water out of your brush before loading up with paint. Watery paint will run under the stencil - not a total disaster but it may not be the effect you are looking for. See bottom left painting the square on the top right, so I added another layer over it and a wash in parts too.

4. Decide whether you want those lines separating each stencil or you want them to join up together as I did for the butterfly painting.

5. Keep warm soapy water in the sink/bucket to wash and clean your stencil regularly. Paint will get under the stencil and when you move it to a different position you will have paint in places you don't want. Keep some old tea towels handy too to dry off your stencil so you can get back to the fun.
6. Contrasting colours work well - such as darks over light or light on dark. Once again, play around and experiment first.

7. Research - Claudine Hellmuth has just introduced a new line of her stencils, her blog has some great tips and here is a great video clip from her:
Like all new tools they take some time to get use to, so I'm going to keep playing around with them and having fun. Are you having fun with stencils too?
thanks Shells for sharing this technique :) Fabulous I'll have a play soon. Also, thanks for the info on the utube vids on Donna...I'll look there too....Ahhh so much Art to do...not enough time! I love your butterfly..it's spectacular x
ReplyDeleteThanks a lot Michelle for sharing the tips, love your butterfly painting
ReplyDeleteNaz
http://www.agentlerebellion.com/
Love it with the moon and leaves! Great job!
ReplyDeleteThese are awesome, Michelle! I love seeing all the steps and how you broke it down. Will definitely have to try this technique. Thanks for sharing :)
ReplyDeleteThanks for this post Michelle, I first used ready made stencils at Tracy Verdugo's Paint Mojo workshop, before that I made my own and they got too wet and flimsy. Thanks for the tips, will definitely try again.
ReplyDelete