Friday, 26 August 2011

Ribbon Town


Ribbon Town  Acrylic on Canvas 30" x 40" 76cm x 101cm

You:  Wow Shells, you finally finished your painting, it looks great.

Shells:  Thanks, I think I'm finished - was thinking about doing a few more finer details, decorating it but I think I will leave it as it is...

You: So this is the painting you were asking for Help!!! with last week??  What changes have you made?

Shells:  Here's the 'original' painting, which I was never happy so I never varnished it but I did hang it and titled it Ribbons. That is why this is called Ribbon Town.   I started painting it not long after I did the Flora Bowley Painting Workshop in March and I was painting it intuitively.


Then I received my Golden paints from the States so I added some more to the painting:


And it still wasn't working for me so on Monday morning at my art group I blocked out a lot of the painting:


and during the week I painted in an ash pink background that didn't work but you can still see in some parts, I also changed the red to an orange-red and made most of the ovals dome shapes and sort of turned it into another one of my funky towns...

You:  Who were your major inspirations for this painting?

Shells:  Flora Bowley and Rosetta Santuci.  Some people have compared my house paintings to Hundertwasser's style but I have not done much research into him or his paintings.

You:  This painting doesn't remind me of Flora's work.

Shells:  Thank you.  I'm having a real mind battle at the moment with this as my work doesn't look like Flora's and therefore I feel as though I failed her workshop, not that there was a pass or a fail but on the other hand I should be working to develop my own style so it's actually good that it's not like Flora's.  I'm very controlled and need to loosen up a bit.

You:  Who is Rosetta Santucci?

Shells:  She's an Australian artist who's painting was recently shown on an Aust TV series "Offspring" above the main characters bed - and I loved it - she works with colour and layers too.  Check out the link.

You:  What are your favourite parts of this painting?

Shells:  I actually like the fact that the 'houses' are not all in a straight line, a little bit wonky, which to me shows the intuitiveness and unplanning of the painting - how it just happened.  Here are some of my favourite sections...

The top right hand section which I could never paint over..

And these 'haunted houses'...


You:  You said earlier this week that you were feeling overwhelmed, how are you feeling now?

Shells: Better, I caught up on a few chores that I had to do at home and got some painting done.  I had a headache most of the week and was feeling tired and achey and a little down.  My kids used up all our internet allowance so now the speed has slowed down and I'm unable to upload pics so right now I'm at my BFF's house using their internet - love you Sandra - she's a really good artist but it's not her passion.

You:  What will you be working on next? 

Shells:  I have to finish my butterfly window and my mini wooden houses and my butterfly girl too.

You:  Thanks for sharing that with us.

Shells: Thank you and have a great weekend.  Take care and stay safe.

Monday, 22 August 2011

Monday Morning Art Group Update

Every Monday morning I go to an art group at a local community learning centre.  People bring in the art they are working on at home and continue in class.  Everyone is supportive and helpful.

Here's what I'm working on...

More Butterfly Windows....needs a little decorating..


Before....

and I worked on Ribbons - she needed blocking out and less colours...sooo...


Before...
Before that...


Feeling a little overwhelmed by life at the moment with everything that needs to be done and the things that I want to do....ie ironing/pay bills/walk the dog/cleaning vs painting....such is life....

Sunday, 21 August 2011

{Shell's Sunday Snippets}

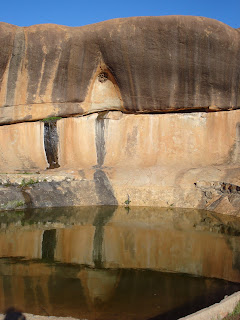
 Went to Muckinbudin over the weekend - a 2 1/2 drive - to stay with friends on their farm.  These are pics of a nearby tourist attractions - Elachbutting Rock and Beringbooding Rock.  More pics on my facebook artist page.


Elachbutting Rock

Elachbutting Rock is a massive granite outcrop, a very popular camping sport for 4x4 wheel clubs and for locals, also a popular site for weddings. The name Elachbutting is thought to mean ‘that things standing’ which is quite feasible as Elachbutting is a large granite rock, a prominent landmark standing out from the surrounding countryside. It has a spectacular colourful wave similar to Hyden’s Wave Rock with the added beauty of ‘Monty’s Pass’, a 30m tunnel caused by a rock slide. An echoing cave similar to an amphitheatre is close by. The 6km track around the rock with its dense trees and shrubs hide many interesting species of flora. The east side is renowned for its masses of Donkey Orchids at the base to the rock.

Beringbooding Rock

Beringbooding Rock has the largest rock water catchment tank in Australia, built in 1937 and holding two and a quarter million gallons. “Sustenance Labour” was used to build the tank at a cost of 10,000 pounds. Beringbooding has an amazing balance boulder, a huge gnamma hole and some of the Kalamaia tribes paintings of hands in a cave at the rear of the rock. Two early pioneer wells are nearby. Spring finds the Pink Ti-tree, Heartshaped Leaf Eucalyptus Melaleuca, Acacia, Grevillea, hakea, Calothamnus, Eromophilia, Cassia, Quandongs, Sandalwood and the native Orchids flowering. Later into October and November the Kunzia Pulchella and One-sided Bottlebrush flower profusely. Many birds inhabit the area.

Thursday, 18 August 2011

Help!!!!

I started this painting in April and have painted it intuitively according to Flora's Workshop but now argh.....I know what's wrong with it but am not sure how to fix it....need to block some of the busyness but which bits and what colour??? 


 Here is where it was at before I started this afternoon.


If you have any ideas or thoughts, esp if you have been to Flora's workshop or know about her work then please leave a comment.

Thanks.

Tuesday, 16 August 2011

Peacock Vase

My Golden Fluid Acrylics arrived yesterday from America much to my joy, so I finished off my Peacock Vase which I started whilst demo painting at the Art Sale a couple of weekends ago.


I created a new facebook page for my art and there's a link on the right hand side - so please click on it and press Like!!  :D

I'd just like to show you what I'm working on at the moment, hopefully I'll have time over the next couple of days to continue working on her - she will have butterfly wings and is my tribute and rememberance of the Flying Lessons online class I'm doing with Kelly Rae Roberts.


Sunday, 14 August 2011

Friday, 12 August 2011

Creating a button and a banner for my Blog

25th March 2012 Edit and update:

A tip for your picture - upload it to http://photobucket.com/ (you will need to have an account) and then re-size it and click save a copy - you will then see a box of links, choose Direct link, the second link which you can use as your url address of your uploaded image.

I recently did a button for the Fly Tribe Shoe Shots Blog Hop and the code looked like this:

<center><a href="http://fly-tribe.blogspot.com.au/"><img src="http://i1147.photobucket.com/albums/o551/ShellsintheBush/ShoeShotssmall-1.jpg"/></a></center>


Please leave a comment below if you have any difficulties and need help and I'll get back to you ASAP.

Thanks.


2nd November 2011 Edit and update:

This is a good site to check out:  http://jenieshell.blogspot.com/2008/11/how-to-make-blog-button.html 

Here are the basics in my own words:

1. You need to create a picture for your button about 150 x 150 pixels.

2. This picture needs an url - so upload it to a blogpost, post, then click on the picture to get the url for it.

3.  In Blogger you need to go into Design, Template, Add a Gadget and click on the HTML option.

4.  You need a code which requires the url for the uploaded picture and the url of the site where you want to link it to

  • Copy the code below and paste it into the text section of your new HTML/Java Script Gadget.
<center><a href="URL address you're Linking to"><img src="URL address of your uploaded image"/></a></center>

  • Replace the sections in red with the two url addresses that meet your needs.
  • click save.
5.  then view your blog to see how you went....

My button code links to my website and looks like this:

<a href="http://shellsinthebush.com/"
target="_blank" >
<img src="https://blogger.googleusercontent.com/img/b/R29vZ2xl/AVvXsEgFbxKKyeBnUhi_FHE6SXaHaNYCEYOSutU4dhcY76sY2Sd7poP48Y3Zj6i0rZp0aaiWAbPfFavEkmdrkfVL7L3Ejg1-XCfXMamUL8zukimhxTvf077jaSm-U3q5yOPnuzhszzVX884JCv4/s1600/blogbutton2.jpg"
alt="Alternative Name" /></a>

and the button I made today for  Your Heart Makes a Difference looks like this:

<center><a href="http://yourheartmakesadifference.com/"><img src="https://blogger.googleusercontent.com/img/b/R29vZ2xl/AVvXsEhte510MkXqiN6w3VgvX-JDw4Fbm1it9N5RP0Wwn2YbDuam_WshJArF10wgrgbHxJD4-NTbiZ9KUIWr5nPxmG1hDjjKPXBZnKVsVjIGYb_yVVkc9ycFiWRem-zgAK0v9eIlfjRAAcP07yU/s1600/yhmadlogo_words_200pxls.png"/></a></center>


I'm not too sure how this works for WordPress or other blog formats/designs.

Thanks,  Sox

**********************************************************************


I'm following this blog button tutorial to make a button for my blog.


So I've created my button but am having trouble creating the scroll bar link thing even though I'm following this tutorial. 


I finally made my scroll bar link but won't really know if it works until you try it out on your blog.  Go on...and let me know how you go.  Thanks.

Today I also made a banner for my blog through picnik.com which was also a lot of fun and time consuming to play with too.

Sizes - button - 125 x 140

- blog banner - about 1000 x 300-350

Here are a couple of banners I tried on....


2nd Nov 2011  Making another button for this site:


Thursday, 11 August 2011

Kangaroos in the Bush


Yes, that's right, I do have kangaroos in my backyard!!!  I was out looking for some Blue Leschenaultia flowers when I came across this big guy and his family.  I was searching for flowers for a colour wheel challenge and took some pics of the beautiful flowers on my block.

This is why I love living here....


Tonight's beautiful, colourful sunset


Red Bottlebrush


Red Grevillea


Seville Oranges


Orange Fungus


Golden Wattle


Rosemary and Lavender


Hardenbergia - native wisteria


Grey Kangaroo


and the sunset got even better....


Wednesday, 10 August 2011

Flying Lessons with Kelly Rae Roberts

Pam Carriker's workshop in Cloth Paper Scissors magazine was one of my first introductions into mixed media collage portraits or girlie collages as I like to call them.  I read the instructions but still had no idea what to do as the language was so foreign to me - what was a substrate and what was a background stamp? - I remember asking myself.  I decided I wanted to create my own girlie collage so I worked it out on my own and found out I loved collage and scrapbooking paper but needed a little practice on painting faces.

Here is my first girly collage titled:  Lady Autumn Leaves - April 2010


After a few attempts a deviant art friend said I should have a look at Kelly Rae Robert's portfolio - so I did and I rejoiced in the fact that I wasn't so weird after all and so did my husband - as my girls had long necks and tilted heads.  More of the journey of my girly collages can be seen on my deviantart collage gallery.

On Monday night I decided to enrol into Kelly's Flying Lessons e-course about tips and tricks to make your creative business soar and am really excited by what I've been learning and can't wait to continue on my journey.

Saturday, 6 August 2011

Little Houses in Progress

Houses feature a lot in my dreams and in my paintings, so when I came across Lauren Gray's art and her blog featuring the houses she had turned into wall sculptures I thought I'd lke to make my own houses with a bit of colour. 

I already had a bit of timber lying around so I had a go at making a house myself and realised that I really need a mitre box.  My dad has a mitre saw and helped me to make the houses.  Then I sanded them, coated them with a sealer, and have gessoed some and collaged scrapbooking papers on to the 'worse' bits of wood.  In the next couple of days I will paint and varnish them as well as add windows, doors etc.

Whilst out at the shops today I found this wooden tray and scrapbooking frame to use as frames.  These I will also gesso and paint in a background too.  Stay tuned over the next week or two for updates on the progress of my little houses.